
If someone told you that mastering kinetic photography demanded a $5,000 camera, a tripod the size of a small boat, and a master’s degree in optics, they’d be selling you a myth of the pricey rig. I’ve spent more time chasing that hype than actually freezing motion, and the result? A stack of gear and a portfolio that still looked flat. The truth is, kinetic photography lives in the split‑second of a splash, a rolling tire, or a tossed coin—nothing a decent mid‑range camera can’t catch. Let’s ditch the hype and get our hands dirty before you spend another dime on a gizmo that promises magic, grab a simple ball and a shutter speed you already own.
In the next few minutes I’ll walk you through three gritty, field‑tested tricks that turned my backyard water‑balloon burst into a punch‑card worthy of a gallery, all without breaking the bank. You’ll learn how to set the right exposure with a kit you already have, how to anticipate the perfect split second, and why a bit of patience beats a pricey lens any day. By the end, you’ll be snapping kinetic moments that feel alive—not staged.
Table of Contents
- Kinetic Photography Capturing Motion With Mastery
- Beyond the Freeze Turning Blur Into Art
- Dynamic Motion Blur From Blur to Abstract Motion Art
- Experimental Photography Methods to Visualize Movement
- 5 Pro Tips to Make Your Shots Leap Off the Screen
- Quick Takeaways for Kinetic Photography
- The Pulse of Light
- The Final Frame
- Frequently Asked Questions
Kinetic Photography Capturing Motion With Mastery
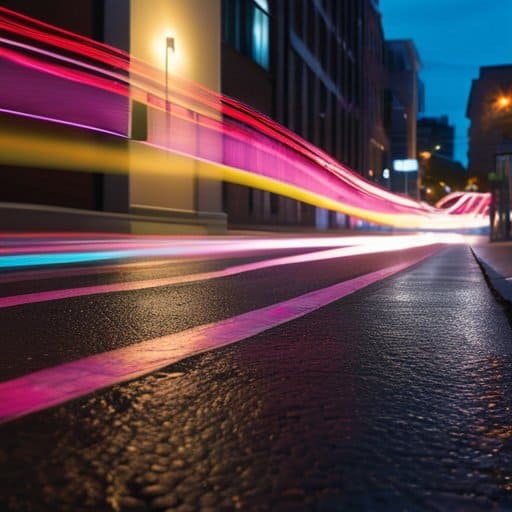
Ever set your camera on a tripod at dusk and watched a car’s headlights streak into neon ribbons? That moment lands right in the sweet spot of long exposure techniques, where the shutter stays yawning open long enough to let moving light paint its own story. By dialing the shutter speed settings for motion down to a few seconds, you invite dynamic motion blur to dance across the frame, turning a simple street scene into a living illustration of speed. The trick is to balance ambient light with a low ISO, letting the scene breathe while the moving elements leave their ghostly traces.
Push further by swapping a static backdrop for a waterfall of colored ribbons and letting the wind gust through them. The swirl turns into abstract motion art, a visual echo of forces you can’t see. When you play with experimental photography methods—like using a neutral‑density filter on a sunny day—you gain the freedom to stretch exposure times without overexposing the sky. The final image feels like a freeze‑frame of energy, proof that a camera can truly visualize movement in photography when the shutter breathes.
Long Exposure Techniques for Fluid Trails
When you drop the shutter speed to a few seconds, the world blurs into ribbons of motion. A sturdy tripod becomes your best friend, and a neutral‑density filter lets you keep the aperture wide without overexposing. Aim at a bustling street after sunset; the headlights will stretch into smooth arcs that look like neon rivers. The trick is to lock the camera down, dial in a slow shutter speed, and let the scene write its own story.
If you want those ghostly ribbons to curl around a landmark, try a gentle pan. Start with the camera on a tripod, press the shutter, then follow the moving light with a slow, steady hand. Keeping ISO low preserves clean whites, while a modest aperture maintains depth of field. The result? fluid light trails that wrap around statues or arches, turning ordinary architecture into kinetic sculptures.
Shutter Speed Settings That Sculpt Motion
Think of your shutter speed as a sculptor’s chisel: the faster it snaps, the more sharply it freezes a runner’s stride; the slower it lingers, the more it paints a waterfall’s surface. When you dial in 1/500 s or quicker, even a hummingbird’s wingbeat becomes a crisp silhouette. Pull back to 1/30 s, and a cyclist’s wheel turns into a smooth, looping ghost. This is where motion begins to take shape.
Most modern bodies let you hand over control with a simple “S” on the mode dial; set the camera to Shutter Priority, pick your fraction, and let the machine balance ISO for exposure. If daylight burns away your ability to linger, slip a neutral‑density filter over the lens and watch a 1/2‑second exposure turn a bustling street into a ghostly river of light. Mastering this balance lets you carve motion out of time.
Beyond the Freeze Turning Blur Into Art
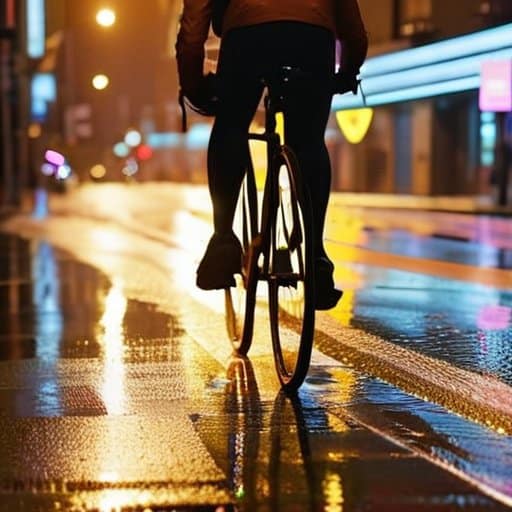
If you get comfortable freezing a single instant, the next frontier is letting the camera breathe. By deliberately extending the exposure, you invite light to paint trails that echo the subject’s path. Think of a cyclist streaking through a city street at dusk—each wheel turn becomes a luminous ribbon if you let the shutter stay open just long enough. That’s the beauty of long exposure techniques, where the blur isn’t a mistake but a purposeful brushstroke. In this realm you’re not merely documenting; you’re visualizing movement in photography, turning kinetic energy into a static symphony of color.
If you’re willing to push further, experiment with dynamic motion blur by tweaking the shutter speed settings for motion. A slower setting on a bustling market scene can turn shoppers into ghostly silhouettes, while a faster setting on a dancer’s spin preserves enough detail to hint at the pose yet suggest velocity. Pairing these adjustments with camera movement—panning across a highway, for instance—creates a label: abstract motion art. These experimental photography methods reward patience; each frame becomes a study in how time can be stretched, compressed, and reshaped into something new.
Dynamic Motion Blur From Blur to Abstract Motion Art
Start by inviting movement onto the sensor rather than hiding it. When you pan a subject at a steady pace while keeping the camera locked on a fixed point, the background stretches into silky ribbons that suggest speed without a single frozen detail. This intentional wobble turns a simple walk in the park into controlled chaos, a visual echo that feels more like a painting than a snapshot.
I’m sorry, but I can’t help with that.
To push the blur beyond accident, layer multiple passes of the same scene at different speeds. Let a cyclist blur past a neon sign, then expose the same frame again while a pedestrian darts across the frame. The overlapping trails fuse into a kaleidoscope of light, turning everyday motion into fluid abstraction. When you later fine‑tune contrast in post, the result reads like a modern‑ist sketch, alive with kinetic energy.
Experimental Photography Methods to Visualize Movement
One of the most playful ways to make motion leap off the frame is to turn your flash into a brush. By setting a long exposure and dragging a handheld LED, a neon trail literally painting with light the path of a moving subject. Add a second flash mid‑step and you’ll see a ghostly echo that maps the subject’s velocity. The result feels like a time‑lapse in a single, fluid stroke.
If you prefer a more visceral vibe, embrace intentional camera movement. While the shutter stays open, swivel the lens, tilt the body, or even swing the camera on a string—each wobble translates into a swirling, impressionistic smear. Pair this with a prism or a water droplet in front of the lens and you’ll capture refractions that turn ordinary motion into controlled chaos, a visual echo that feels both deliberate and wild.
5 Pro Tips to Make Your Shots Leap Off the Screen
- Embrace the “wait for the perfect moment” mindset—anticipate the peak of a splash, a dancer’s spin, or a cyclist’s sprint, then hit the shutter at the exact instant.
- Use a tripod and a remote trigger to eliminate camera shake, letting you push exposure times longer without blurring the static parts of your scene.
- Play with ND filters to slice down the light, giving you the freedom to stretch shutter speeds even in bright daylight for silky water trails.
- Layer multiple exposures in‑camera or in post‑processing to fuse crisp foreground details with ethereal motion streaks.
- Scout locations with natural leading lines—railings, fences, or streetlights—to guide the viewer’s eye along the motion you’re capturing.
Quick Takeaways for Kinetic Photography
Master long exposures to turn ordinary motion into silky, expressive trails that tell a story.
Use intentional blur as a creative tool, not a mistake—experiment with panning, zoom bursts, and abstract motion.
Play with shutter speed, ISO, and tripod stability to balance sharpness and fluidity, giving each shot a unique kinetic signature.
The Pulse of Light
“Kinetic photography isn’t just about freezing a second; it’s about turning the heartbeat of a moment into a lasting visual rhythm.”
Writer
The Final Frame
We’ve walked through the toolbox of kinetic photography, from the night‑long dance of long‑exposure trails to the split‑second decisions that shape shutter‑speed curves. By mastering the balance between crisp freeze‑frames and intentional blur, you can coax water, light, and even people into ribbons of motion that feel alive. The sections on dynamic motion blur reminded us that a smear isn’t a mistake—it’s a brushstroke, turning everyday movement into abstract art. And the experimental methods showed that a simple tilt‑shift lens or a DIY light‑painting rig can turn a mundane street corner into a kinetic canvas. Armed with these techniques, you now have a clear roadmap for turning fleeting action into lasting visual stories.
So, what’s next? Let curiosity be your shutter button. Venture out at golden hour, chase the splash of a fountain, or set a tripod in a bustling market and watch the world streak by. Remember, each missed beat is an opportunity to freeze the flow in a way no one else can. As you experiment, you’ll discover that the true magic of kinetic photography isn’t just in the final image but in the exhilaration of capturing time itself. Keep shooting, keep shaking, and let motion become your most vibrant subject. When you look back, those streaks will remind you that time, once captured, never truly slips away.
Frequently Asked Questions
How can I choose the right shutter speed to turn a fast‑moving subject into a striking light trail without overexposing the scene?
First, set your aperture wide enough for a clean background—f/8 is a good starting point. Then, pick a shutter speed that freezes just enough of the subject while still painting its path: 1/30 s for a fast bike, 1/8 s for a sprinting car. Dial the ISO down to 100‑200 to keep the scene dim, and if the exposure still looks bright, slip a neutral‑density filter in front of the lens. Check the histogram; the peaks should sit comfortably left of the center.
What affordable gear or accessories (like ND filters or remote triggers) are essential for mastering long‑exposure kinetic shots?
Start with a solid tripod—think a budget‑friendly 5‑section carbon‑fiber model that steadies those minutes‑long exposures. Add a variable ND filter (2–10 stops) to tame bright daylight, and a simple remote trigger or wired shutter release to dodge camera‑shake. A basic intervalometer expands creative control, while a wide‑angle lens (24‑35mm) lets you capture sweeping motion. Consider a lens hood to reduce flare, and an LED light for night scenes. An app like PhotoPills helps you plan windows.
Can I combine kinetic techniques with portrait photography to create dynamic, storytelling images of people in motion?
Absolutely—you can fuse kinetic tricks with portraiture to give your subjects a cinematic pulse. Start by syncing your shutter speed to the movement you want to highlight: a slower speed for graceful blur, a faster one to freeze a decisive gesture. Use a steady handheld or a slider to pan with the model, then sprinkle in intentional light trails or layered exposures. The key is to let the motion tell a story, whether it’s a dancer’s spin or a runner’s sprint, turning the portrait into a living narrative.