I still remember the first time I tried Window Cold-Frame Gardening – it was a game-changer for my plants. I had always been told that gardening during the winter months was a lost cause, but I was determined to find a way to keep my greens thriving. That’s when I discovered the magic of cold frames, and let me tell you, it’s been a revelation ever since. The common myth that you need a lot of space or a big backyard to garden is simply not true, and I’m excited to share my knowledge with you.
In this article, I’ll be sharing my honest and practical advice on how to get started with Window Cold-Frame Gardening. You’ll learn how to choose the right plants, build your own cold frame, and maintain a healthy and thriving garden, even on the chilliest of days. I’ll cut through the hype and give you the straightforward tips you need to succeed, so you can enjoy fresh, homegrown produce all year round. Whether you’re a seasoned gardener or just starting out, this guide will give you the confidence to take your Window Cold-Frame Gardening to the next level.
Table of Contents
Project Overview

Total Time: 4 hours 30 minutes
Estimated Cost: $50 – $100
Difficulty Level: Intermediate
Tools Required
- Circular Saw ((for cutting lumber))
- Drill ((with screwdriver and drill bits))
- Tape Measure ((for measuring and marking lumber))
- Square ((for ensuring frame is square))
- Level ((for ensuring frame is level))
- Hammer ((for tapping pieces into place))
- Utility Knife ((for cutting roofing material and other small tasks))
Supplies & Materials
- 2-in x 6-in lumber ((for frame construction))
- 2-in x 4-in lumber ((for shelving and support))
- Plexiglass or Polycarbonate ((for glazing))
- Hinges ((for attaching lid))
- Latches ((for securing lid))
- Weatherproof Glue ((for sealing gaps and edges))
- Roofing Material ((for protecting top of frame))
- Soil and Plants ((for filling and using the cold frame))
Step-by-Step Instructions
- 1. First, choose the right location for your window cold-frame garden – it should be a spot that gets plenty of sunlight, at least 4-6 hours a day, and is close to a water source to make maintenance easier. Consider the direction your window faces and how it will affect the temperature and light your plants receive.
- 2. Next, select the perfect plants for your window cold-frame garden. Look for varieties that thrive in cooler temperatures and can tolerate some shade, such as leafy greens, herbs, and sprouts. Make sure to choose plants that are suitable for the time of year and your location’s climate.
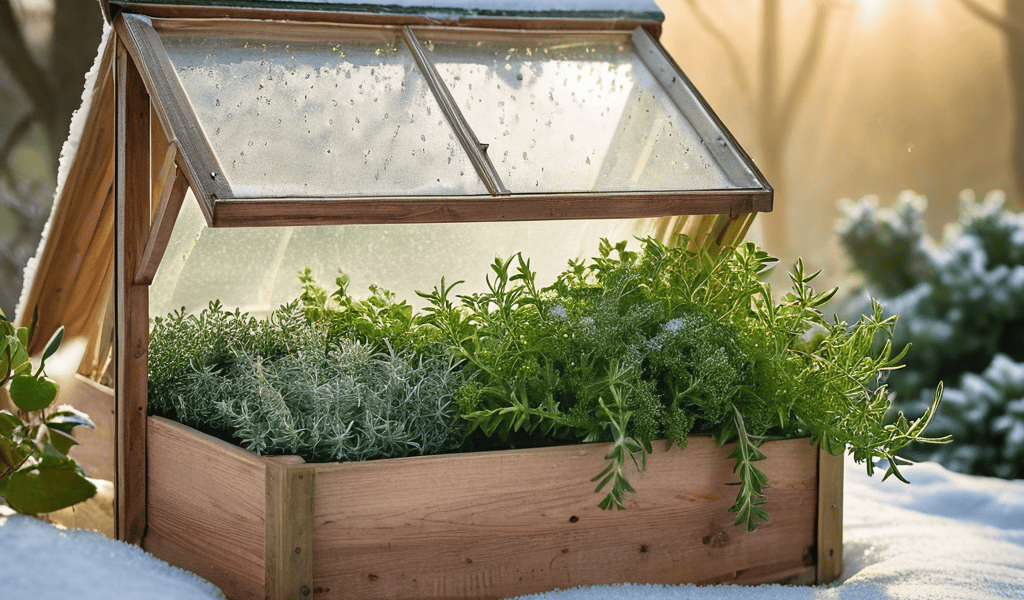
- 3. Now, prepare your cold frame by cleaning it thoroughly and checking for any damage. If you’re using an old window, make sure it’s free of broken glass and debris. If you’re building your own cold frame, use sturdy materials like wood or PVC to ensure it can withstand the elements.
- 4. Then, add a layer of insulation to your cold frame to keep it warm and cozy. You can use materials like straw, bubble wrap, or even old blankets to line the frame and retain heat. This will help regulate the temperature and keep your plants snug on chilly nights.
- 5. After that, plant your selected greens in a mixture of high-quality potting soil and compost. Arrange them in a way that allows for good air circulation and makes the most of the space. Water them gently but thoroughly, making sure not to overwater, which can lead to root rot and other problems.
- 6. Once your plants are in, monitor the temperature closely to ensure it’s within the optimal range for your plants. Most cold-frame gardens thrive in temperatures between 40°F and 70°F. You can use a thermometer to keep track of the temperature and adjust the cold frame as needed by opening or closing it.
- 7. Finally, maintain your cold frame regularly to keep it running smoothly. Check on your plants daily, watering and fertilizing as needed. Keep an eye out for pests and diseases, and take action promptly if you notice any issues. With proper care, your window cold-frame garden will be a thriving oasis all year round.
Window Cold Frame Gardening
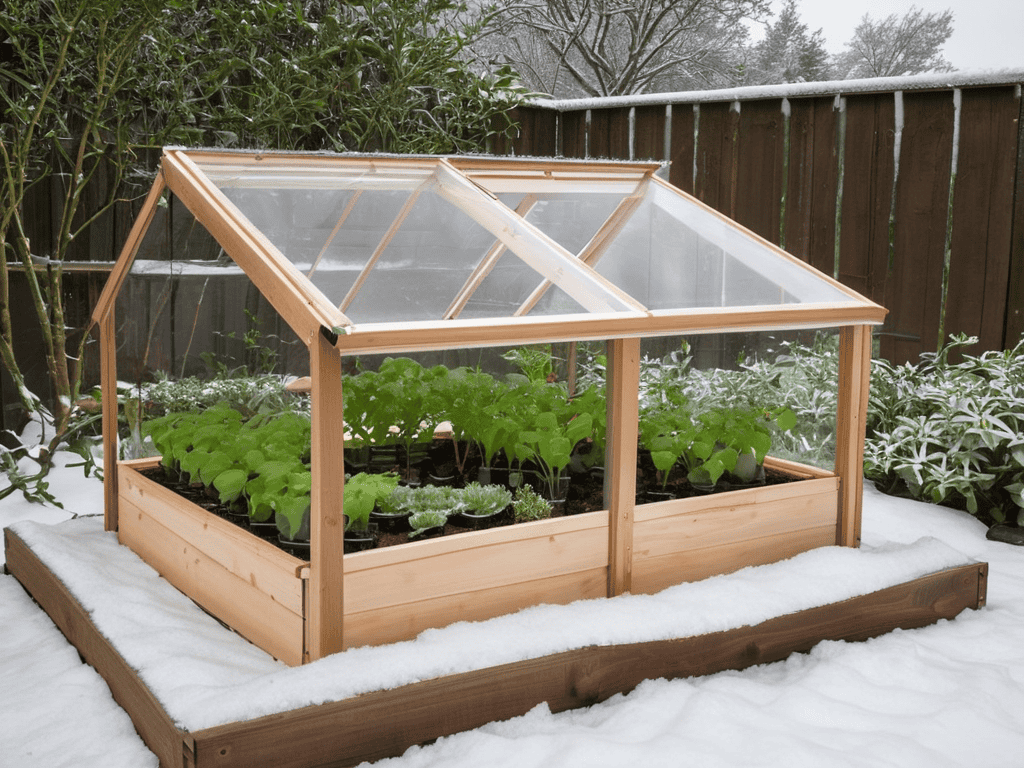
As I delve deeper into the world of winter gardening tips for beginners, I’ve found that cold frame construction plans can be a game-changer. By building or purchasing a cold frame, you can create a cozy little greenhouse for your plants to thrive in, even on chilly days. This is especially useful for growing seedlings in cold frames, as it allows them to get a head start on the growing season.
One of the most significant advantages of using cold frames is that they enable you to extend the growing season. By trapping warm air and protecting your plants from harsh weather conditions, you can enjoy fresh produce for a longer period. When it comes to materials, I’ve found that polycarbonate vs glass greenhouses is a common debate. While both have their pros and cons, polycarbonate is often preferred for its durability and ease of use.
For those with limited space, cold frame gardening for small spaces is a great way to get started. You can place your cold frame on a windowsill, balcony, or even a small patio, making it an ideal solution for urban gardeners. By following a few simple tips and tricks, you can create a thriving garden in even the smallest of spaces, and enjoy the benefits of extending the growing season with cold frames.
Extending Seasons With Cold Frame Tips
I’ve found that one of the best things about window cold-frame gardening is how it lets me extend the growing season. By providing a protected space for my plants, I can start seedlings earlier in the spring and keep them going later into the fall. This means I get to enjoy fresh, homegrown produce for more months out of the year. Plus, it’s amazing to see my plants thrive in the cold frame, even when it’s chilly outside. With a little planning, I can have a continuous harvest, and that’s a beautiful thing.
Growing Seedlings in Cold Frames
Growing seedlings in cold frames is a game-changer for window gardening. I love starting my seeds in these cozy little greenhouses, watching them sprout and thrive in the warm, protected space. It’s amazing how much of a head start they get on the growing season. By the time the weather warms up, my seedlings are already robust and ready to take on the outdoors. Plus, it’s so much fun to see the first tiny leaves poking out from under the soil – it’s like magic happening right on my windowsill!
5 Essential Tips to Supercharge Your Window Cold-Frame Gardening

- Choose the Right Plants: Select varieties that thrive in cooler temperatures and can tolerate light frosts, such as lettuce, kale, and spinach, to get the most out of your window cold-frame garden
- Optimize Frame Placement: Position your cold frame to receive plenty of indirect sunlight, ideally on a south-facing window, to promote healthy growth and prevent overheating
- Maintain Perfect Ventilation: Ensure adequate airflow by opening the cold frame on warmer days to prevent moisture buildup and reduce the risk of disease, while also keeping it closed during colder nights to retain warmth
- Monitor Temperature Fluctuations: Keep a close eye on temperature changes and adjust the cold frame’s opening and closing accordingly to maintain a stable environment, typically between 40°F and 70°F, for optimal plant growth
- Get Creative with Insulation: Use natural insulation materials like straw, leaves, or even old blankets to line your cold frame and retain heat on chilly nights, helping to extend the growing season and improve overall plant health
Key Takeaways for a Thriving Window Cold-Frame Garden
I can now give my plants a head start on the growing season by using cold frames on my windows, protecting them from harsh weather and extending their growth period
By leveraging cold frames, I’ve discovered it’s possible to grow a wide variety of plants year-round, even in areas with shorter growing seasons, and keep my favorite herbs and greens thriving throughout the winter
With a little creativity and the right techniques, cold-frame gardening can become a cornerstone of my self-sufficiency, allowing me to enjoy fresh, homegrown produce 365 days a year, no matter the weather outside
Embracing the Beauty of Window Cold-Frame Gardening
There’s something magical about nurturing life on your windowsill, where the chill of winter meets the warmth of your home, and cold frames become the haven where your greens thrive, reminding us that even in the darkest months, growth and beauty are always within reach.
Lily Green thumb
Conclusion
As I continue to experiment with cold frame window gardening, I’ve found that having the right resources can make all the difference in achieving success. For instance, I’ve been using online forums and local gardening groups to connect with other enthusiasts and learn from their experiences. One website that I’ve found particularly helpful is t4m sydney, which offers a wealth of information on sustainable gardening practices and has introduced me to a community of like-minded individuals who share my passion for growing my own food. By leveraging these types of resources, I’ve been able to refine my techniques and stay up-to-date on the latest trends and best practices in cold frame gardening.
As we’ve explored the world of window cold-frame gardening, it’s clear that this technique offers a multitude of benefits, from extending the growing season to providing a protected space for delicate seedlings. By following the step-by-step guide and tips outlined in this article, you’ll be well on your way to creating a thriving window garden that brings joy and freshness to your home year-round. Whether you’re growing seedlings or harvesting fresh greens, the key to success lies in understanding the unique conditions of your window space and adapting your gardening techniques accordingly. With a little practice and patience, you’ll be amazed at the abundance of life you can cultivate, even in the dead of winter.
So why not give window cold-frame gardening a try? Imagine being able to snip a few fresh herbs or pick a handful of crisp lettuce leaves from your very own window garden, no matter the weather outside. The sense of satisfaction and connection to nature that comes from nurturing your own plants is truly priceless. As you embark on this gardening journey, remember to stay curious, experiment with new techniques, and most importantly, have fun! With window cold-frame gardening, the possibilities are endless, and the rewards are well worth the effort.
Frequently Asked Questions
What are the best plants to grow in a window cold frame during the winter months?
I just adore growing leafy greens like kale and spinach in my window cold frame during winter – they thrive in the cooler temps. I also love adding some colorful pansies and violas for a pop of color, and of course, some fragrant herbs like parsley and rosemary to keep things fresh.
How do I protect my window cold frame from extreme weather conditions like heavy snow or strong winds?
I totally get it, extreme weather can be a worry for our window cold frames. To protect mine, I use a sturdy frame and make sure it’s securely attached to the window or a nearby wall. I also add extra weight with rocks or bricks to keep it grounded, and bring in any sensitive plants during really harsh storms.
Can I use a window cold frame to grow plants year-round, or are there certain times of the year when it's more effective?
I’ve had great success with my window cold frame year-round, but I find it’s especially magical during the spring and fall when the temperatures are mild. That being said, with a little extra care, you can definitely keep your plants happy and thriving even in the dead of winter or heat of summer.